
React Js Calculator: A calculator is a handy electronic tool that helps us do math problems like adding, subtracting, multiplying, and dividing numbers really fast.
It has buttons with numbers and signs like + and -, and when we press those buttons in the right order, the calculator shows us the answer on a screen. It’s like having a math helper that makes tricky math easier.
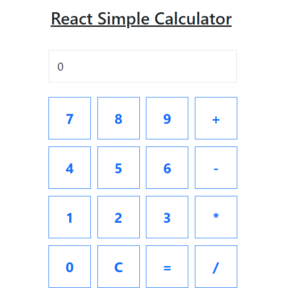
So In this tutorial, We will learn to create a React simple calculator with the following features –
- Display Area: A space to see your numbers and calculations.
- Number Buttons: Buttons with numbers (0-9) for input.
- Operator Buttons: Symbols (+, -, *, /) for choosing the calculation.
- Equal Button: Press to get the calculation result.
- Clear Button: Clears entered numbers.
- Math Operations: Basic math like add, subtract, etc.
- Styling: Designed using Bootstrap 5 for a clean look.
- React Component: Built using React.js for interactivity.
- Functionality: Buttons work to input, operate, and display.
- Usage: Solves simple math problems fast.
Steps to Create Calculator Using Function Component
1. Set Up Basic Configuration
First of all, You must set up the following basic configuration –
2. Create Calculator Directory
After creating the React App, You will get the default directory structure. Now, Create a calculator directory like –
myapp
 |__src/
    |__ Calculator/
    |    |__ Calculator.css
    |    |__ Calculator.js
    |__ App.js
    |__ index.js
Default React App contains more folders & files but I have shown here only required one.
3. Create a Calculator component
Now, Create a file Calculator.js inside the ‘Calculator’ folder and define a function component named ‘Calculator’ for making a simple calculator system.
File Name – Calculator.js
import React, { useState } from 'react';
import 'bootstrap/dist/css/bootstrap.min.css';
import "./Calculator.css"

function Calculator() {
  const [resultValue, setResultValue] = useState('0');

  const handleBtnClick = (buttonValue) => {
    if (resultValue === '0') {
      setResultValue(buttonValue);
    } else {
      setResultValue(resultValue + buttonValue);
    }
  };

  const handleCalculate = () => {
    try {
      setResultValue(eval(resultValue).toString());
    } catch (error) {
      setResultValue('Error');
    }
  };

  const handleClear = () => {
    setResultValue('0');
  };

  return (
    <div className="container mt-5">
      <div className='row'>
        <div className='col-sm-4'>
        <div className="calculator">
        <h4>React Simple Calculator</h4>
        <input type="text" className="form-control mb-3" value={resultValue} readOnly />

        <div className="input-group">
          <button className="btn btn-outline-primary" onClick={() => handleBtnClick('7')}>7</button>
          <button className="btn btn-outline-primary" onClick={() => handleBtnClick('8')}>8</button>
          <button className="btn btn-outline-primary" onClick={() => handleBtnClick('9')}>9</button>
          <button className="btn btn-outline-primary" onClick={() => handleBtnClick('+')}>+</button>
        </div>
        <div className="input-group">
          <button className="btn btn-outline-primary" onClick={() => handleBtnClick('4')}>4</button>
          <button className="btn btn-outline-primary" onClick={() => handleBtnClick('5')}>5</button>
          <button className="btn btn-outline-primary" onClick={() => handleBtnClick('6')}>6</button>
          <button className="btn btn-outline-primary" onClick={() => handleBtnClick('-')}>-</button>
        </div>
        <div className="input-group">
          <button className="btn btn-outline-primary" onClick={() => handleBtnClick('1')}>1</button>
          <button className="btn btn-outline-primary" onClick={() => handleBtnClick('2')}>2</button>
          <button className="btn btn-outline-primary" onClick={() => handleBtnClick('3')}>3</button>
          <button className="btn btn-outline-primary" onClick={() => handleBtnClick('*')}>*</button>
        </div>
        <div className="input-group">
          <button className="btn btn-outline-primary" onClick={() => handleBtnClick('0')}>0</button>
          <button className="btn btn-outline-primary" onClick={handleClear}>C</button>
          <button className="btn btn-outline-primary" onClick={handleCalculate}>=</button>
          <button className="btn btn-outline-primary" onClick={() => handleBtnClick('/')}>/</button>
        </div>
      </div>
        </div>
        <div className='col-sm-8'>

        </div>
      </div>
    </div>
  );
}

export default Calculator;
Steps to write code:
Sure, here’s an explanation of the code line by line in a pointwise manner:
- Import React and the `useState` hook from the ‘react’ library.
- Import the Bootstrap CSS and a custom CSS file named “Calculator.css”.
- Define a functional component named `Calculator`.
- Inside the component, set up a state variable `resultValue` using the `useState` hook, initialized to `’0’`.
- Define a function `handleBtnClick` that takes a `buttonValue` parameter and updates `resultValue` based on the button clicked.
- If the current `resultValue` is `’0’`, update it with the `buttonValue`; otherwise, concatenate the `buttonValue` to the existing `resultValue`.
- Define a function `handleCalculate` that calculates the result of the expression in `resultValue` using the `eval` function.
- If the evaluation succeeds, convert the result to a string and update `resultValue`. If there’s an error during evaluation, set `resultValue` to `’Error’`.
- Define a function `handleClear` that resets `resultValue` to `’0’`.
- Return JSX (React code) to render the calculator interface.
- Use the Bootstrap grid system to structure the layout: a container with rows and columns.
- Inside the component, create a title heading and an input field to display the `resultValue`, which is bound to the input’s value.
- Create a series of rows of buttons, each containing a group of four buttons for digits and operators.
- Assign click handlers to the buttons using inline arrow functions to call `handleBtnClick` with the respective value when clicked.
- The buttons display digits 0-9 and operators +, -, *, and /.
- Include buttons for calculation (`=`) and clearing (`C`), which have their own specific handlers.
- The component returns the entire layout of the calculator interface, with buttons organized in a grid.
- The component is exported as the default export of the module, allowing it to be used in other parts of the application.
4. Design a Calculator using CSS
Now, Create a folder named ‘Calculator.css’ within the ‘Calculator’ folder.
File Name – Calculator.css
.calculator button{
    width: 60px;
    height: 60px;
    border-radius: 0px;
    margin: 5px 10px;
    font-weight: bold;
    font-size: 20px;
}
.calculator .input-group{
    width: 81%;
    display: inline-block;
}
.calculator input[type="text"]{
    border-radius: 0px;
    height: 46px;
    display: inline-block;
    width: 75%;
    margin: 0px 10px

}
.calculator h3{
    position: relative;
    left: 17px;
    text-decoration: underline;
    margin-bottom: 22px;
    color: #0e7bf2;
}
Explanation:
.calculator button:
- Styles buttons within the calculator.
- Sets size, square corners, margins, bold text, and font size.
.calculator .input-group:
- Styles input groups within the calculator.
- Adjusts width and makes them inline blocks.
.calculator input[type=”text”]:
- Styles text input within the calculator
- Sets size, square corners, margins, and width.
.calculator h3:
- Styles heading within the calculator.
- Adjusts position, adds underline, margin, and changes text color.
5. Load a Calculator component
- It imports the `Calculator` component from the “./calculator/Calculator” path.
- The `App` component returns the `Calculator` component, which is intended to render a calculator interface.
- The `App` component is exported as the default export of the module.
File Name – App.js
import Calculator from "./calculator/Calculator";
function App() {
  return (
    <Calculator />
  )
}

export default App;
6. Display Calculator in Web Browser
To display the calculator in a web browser, first run the following command in your terminal.
npm start
After that, open the following URL in your web browser to see the calculator
http://localhost:3000/